1.博客的现状
现在网络上有很多的博客平台,比如CSDN、掘金、简书、博客园、知乎等等。在搜索引擎搜索相关内容时,往往前面几篇都被这几个大平台垄断了,个人博客一般隐藏在后面,如果没有做SEO优化,甚至完全搜不到,而很多优质的文章都藏在个人博客里面,现在很多静态博客都会和Github结合起来搭建,而Github屏蔽了百度的爬虫抓取,所以在百度很难搜到搭建在GitHub的个人博客,这是一大遗憾。
Tips:
SEO是指按照搜索引擎的算法,提升你的文章在搜索引擎中的自然排名。
2.博客的分类
博客一般可以分为静态博客和动态博客。
静态博客:一般来说只有前端展示,即直接渲染生成HTML标准的文件呈现给客户端,没有后端数据库支持的博客叫做静态博客。此类博客比较轻量级,部署简单,成本较低,速度也很快,安全性高。
动态博客:动态指的是前端html和css等展示是通过动态调用再解析而成,不是生成的现成静态文件,且会与后台数据库进行交互,进行数据传递。
Tips:
通俗理解就是静态博客不需要使用服务器,而动态博客需要使用服务器进行交互。
3.动态博客搭建(halo)
当手中有一台云服务器(或者有一台具有公网IP的电脑),可以使用这种博客搭建方式。下面是以云服务器为例的具体搭建方法。
SSH远程连接云服务器终端(使用mobaxterm)
以下是服务器登录后的终端界面
Welcome to Ubuntu 20.04.5 LTS (GNU/Linux 5.4.0-90-generic x86_64)

 * Documentation:  https://help.ubuntu.com
 * Management:     https://landscape.canonical.com
 * Support:        https://ubuntu.com/advantage

 * Introducing Expanded Security Maintenance for Applications.
   Receive updates to over 25,000 software packages with your
   Ubuntu Pro subscription. Free for personal use.

     https://ubuntu.com/pro
New release '22.04.2 LTS' available.
Run 'do-release-upgrade' to upgrade to it.


Welcome to Alibaba Cloud Elastic Compute Service !

Last login: Fri Mar 31 13:44:30 2023 from 223.112.6.226
lin@LIN:~$
查看halo博客系统的官方文档(使用 Docker Compose 部署)
进入halo官网,可以基本上了解部署过程,由于halo博客系统的更新,halo 2.0 的底层架构变动,无法兼容 1.x 的数据,使用尽量使用新版的halo系统。
官方提供了三种部署方式,即Docker、Docker Compose以及1Panel。这三种方式都不复杂,其中1Panel部署是刚刚出的,最为简单,这里就不做过多介绍,可以直接去halo官网查看教程直接部署。这里我们选择使用Docker Compose。
安装Docker以及Docker Compose
这个直接参考Docker的官方文档,找到服务器系统对应的安装教程即可。
创建halo博客的文件路径
在云服务器建立存放halo博客的一个目录文件,halo博客所产生的数据存放在该目录下。
mkdir ~/halo && cd ~/halo
#这里将halo目录建在了当前用户的目录下,并且进入了halo目录下
创建docker-compose.yaml
在halo目录下新建一个配置文件为docker-compose.yaml,该文件用于配置应用程序需要的所有服务。然后,使用一个命令,就可以从 YML 文件配置中创建并启动所有服务。
配置docker-compose.yaml
halo提供了三种实例模式,分别为Halo + PostgreSQL、Halo + MySQL和Halo + H2 数据库。这里为了方便演示使用H2数据库。文件具体配置如下。
version: "3"

services:
  halo:
    image: halohub/halo:2.4.0
    container_name: halo
    restart: on-failure:3
    volumes:
      - ./:/root/.halo2
    ports:
      - "8090:8090"
    healthcheck:
      test: ["CMD", "curl", "-f", "http://localhost:8090/actuator/health/readiness"]
      interval: 30s
      timeout: 5s
      retries: 5
      start_period: 30s
    command:
      # 外部访问地址,请根据实际需要修改
      - --halo.external-url=http://localhost:8090/
      # 初始化的超级管理员用户名
      - --halo.security.initializer.superadminusername=admin
      # 初始化的超级管理员密码
      - --halo.security.initializer.superadminpassword=P@88w0rd
放行端口号
通过刚才的配置文件可知,halo使用的端口为8090,云服务器需要放行8090端口(当然,这个端口可以在配置文件里进行修改)。端口放行的过程在云服务器的控制台界面进行修改即可。
启动 Halo 服务
当halo系统配置完毕,端口放行成功,就可以在终端启动halo服务,官网教程里缺了管理员执行权限,需要进行修改。
sudo docker-compose up -d
# docker 的服务是在后台运行的,通过 -d 指定容器的运行模式
以下是容器信息。
lin@LIN:~/halo$ sudo docker ps
CONTAINER ID   IMAGE          COMMAND                  CREATED       STATUS                      PORTS                                       NAMES
eb2c5f823445   halohub/halo   "/bin/sh -c 'java -X…"   11 days ago   Up 14 minutes (unhealthy)   0.0.0.0:8090->8090/tcp, :::8090->8090/tcp   halo
lin@LIN:~/halo$
博客界面访问如下(还挺好看,嘿嘿)

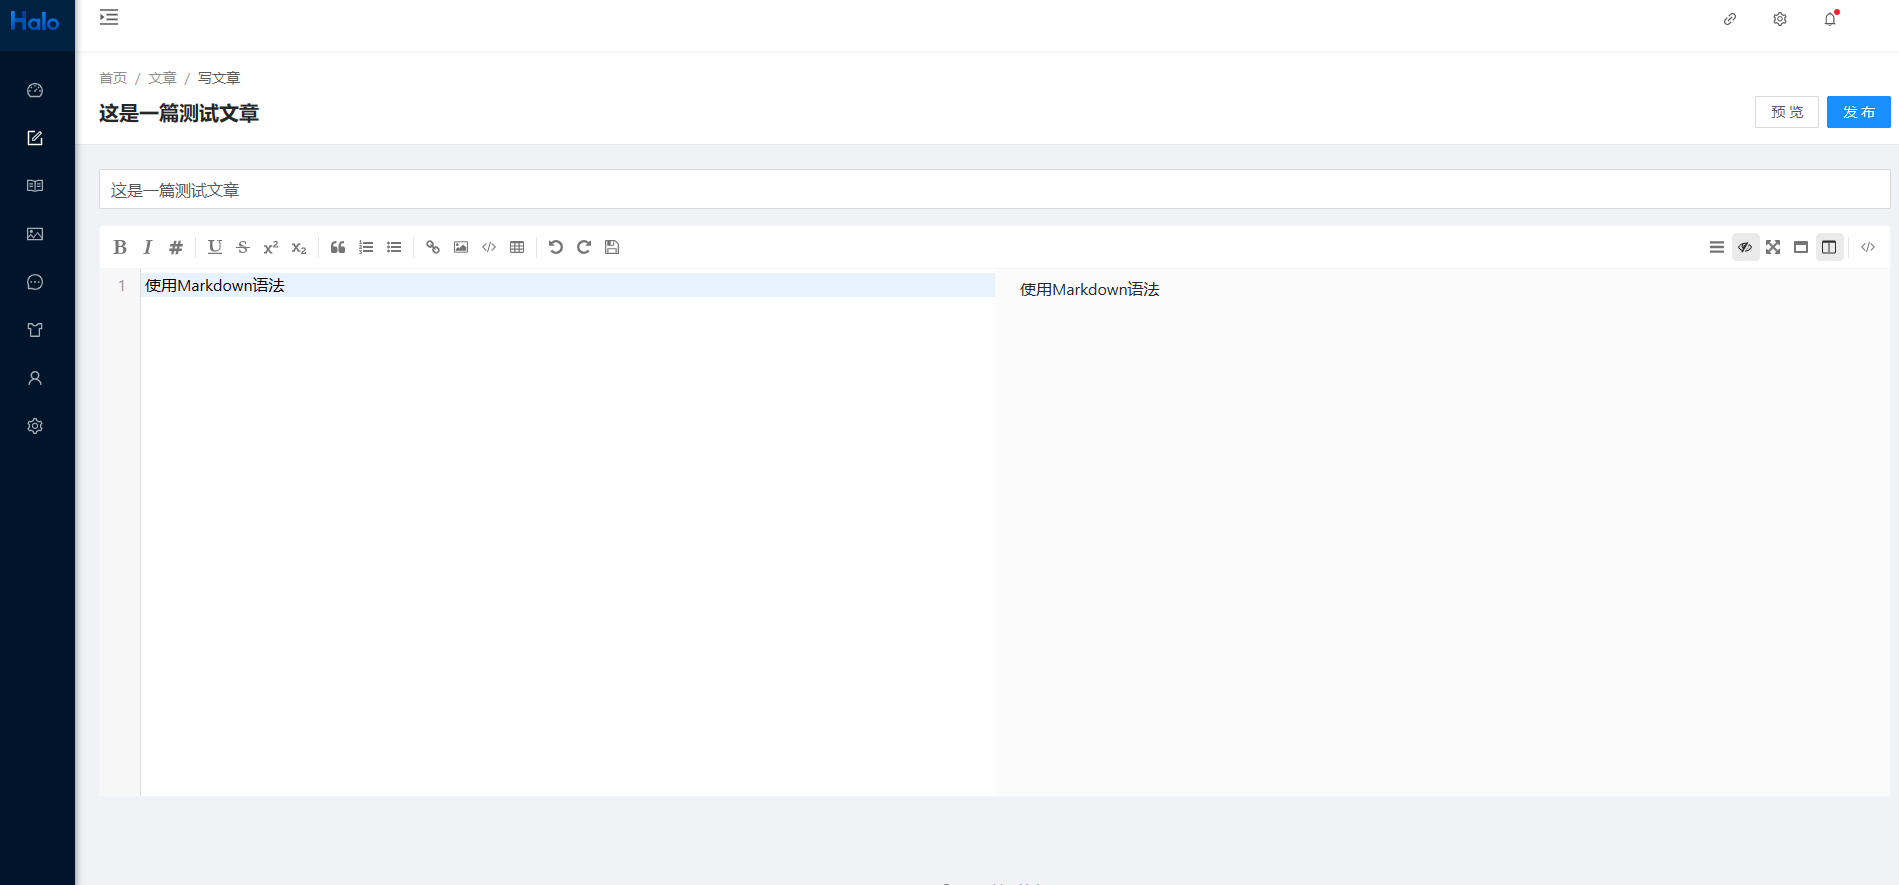
登录博客系统并进行个性化配置
halo博客的后台管理系统简单易用,在docker-compose.yaml中有管理员的登录账号以及对应密码。写博客文章直接点击对应按钮即可。截图如下。
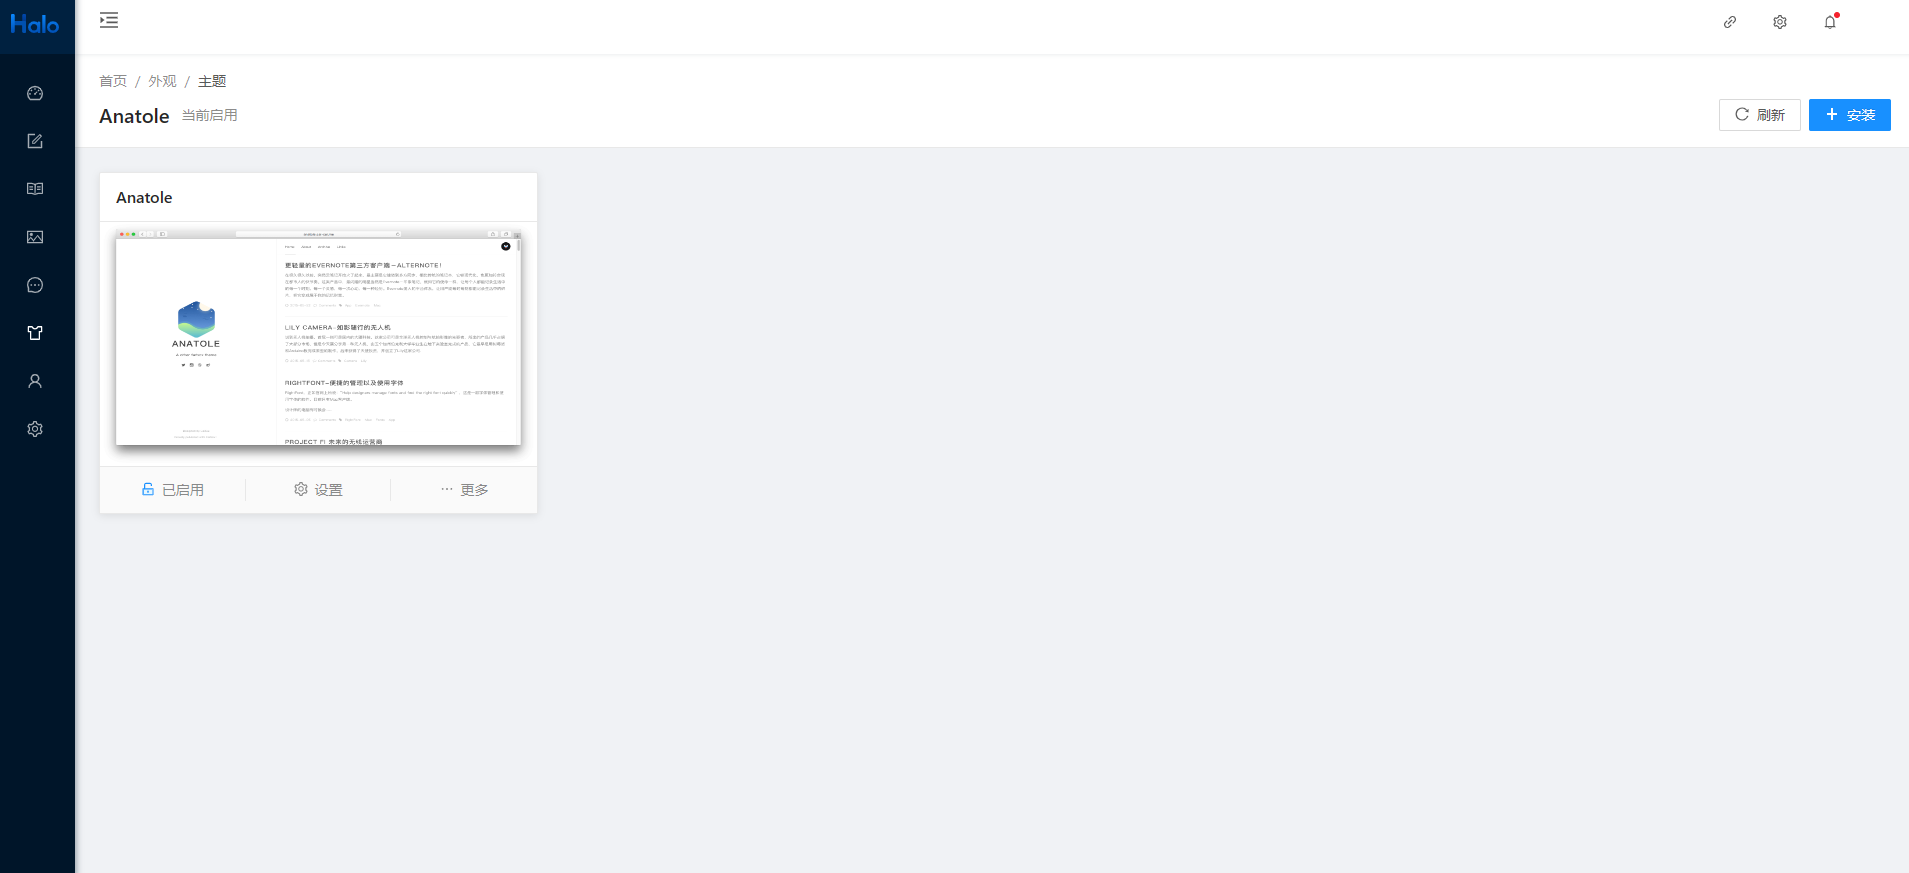
此外,还可以进行主题配置,选择你喜欢的主题(halo有好多好看炫酷的主题~),配置界面如下。
好的,关于halo博客的搭建,就介绍到这里。
Tips:
SSH是一种网络协议,用于计算机之间的加密登录。

mobaxterm是一款终端工具,用于远程控制云服务器。

halo官方文档(https://docs.halo.run/getting-started/install/docker-compose/)

Docker是一个开源的应用容器引擎,可以让开发者打包他们的应用以及依赖包到一个轻量级、可移植的容器中,然后发布到任何流行的Linux机器上,也可以实现虚拟化。

Compose 是用于定义和运行多容器 Docker 应用程序的工具。通过 Compose,可以使用 YML 文件来配置应用程序需要的所有服务。然后,使用一个命令,就可以从 YML 文件配置中创建并启动所有服务。

安全组是一种虚拟防火墙,能够控制ECS实例的出入站流量。可以让用户从端口、IP的维度来筛选对应服务器的访问者,从而形成一个云上的安全域。
4.静态博客搭建(hugo)
通过搭建动态博客需要使用云服务器或者是具有公网IP的主机,如果没有这些资源的话就不容易搭建一个动态博客,又或者是服务器到期需要对博客文件进行迁移,这是很不方便的。所以笔者使用的是静态博客,如今比较热门的是hexo和hugo博客生成器,这里不讨论其实现的原理,理论上hugo的博客生成效率更高,调试也更方便,并且相对于hexo依赖Node.js环境,hugo仅需要一个二进制文件hugo(hugo.exe)即可轻松生成静态页面。当然,这两者都需要使用git将生成的静态页面上传到GitHub(当然,也可以部署到自己的服务器上,此时可以不用git,部署到GitHub的好处就是省了买服务器的钱),下面是搭建hugo博客的过程。
查看hugo中文文档
由文档可知,hugo使用只需要下载hugo的二进制文件即可使用。鉴于笔者的电脑是Windows系统,同时为了兼容更多hugo主题,笔者选择的发行包是hugo_extended_0.111.3_windows-amd64,下载完成之后,将压缩包解压即可,建议重命名为hugo。同时为实现博客编写的便携化(比如在不同电脑环境下,只通过插入U盘就可以编写并上传更新博客),笔者就不设置环境变量了,直接在hugo文件夹下通过相对路径进行操作。
下载git
直接下载即可,选择默认配置。
创建博客文件目录
在解压并且重新命名为hugo之后,文件夹下有三个文件,分别是hugo.exe、LICENSE和README.md。其中hugo.exe是核心文件,LICENSE是许可证,README.md对hugo进行了介绍以及使用方法。通过hugo的getting-started,在hugo目录下执行以下命令即可创建博客文件目录。
Dell@DESKTOP-22JGA5Q MINGW64 /h/hugo
$ ./hugo.exe new site blog_text
Congratulations! Your new Hugo site is created in H:\hugo\blog_text.

Just a few more steps and you're ready to go:

1. Download a theme into the same-named folder.
   Choose a theme from https://themes.gohugo.io/ or
   create your own with the "hugo new theme <THEMENAME>" command.
2. Perhaps you want to add some content. You can add single files
   with "hugo new <SECTIONNAME>\<FILENAME>.<FORMAT>".
3. Start the built-in live server via "hugo server".

Visit https://gohugo.io/ for quickstart guide and full documentation.
此时进入到生成的博客目录,列举文件和文件夹如下。
Dell@DESKTOP-22JGA5Q MINGW64 /h/hugo
$ cd blog_text/

Dell@DESKTOP-22JGA5Q MINGW64 /h/hugo/blog_text
$ ls
archetypes/  config.toml  data/     public/  themes/
assets/      content/     layouts/  static/
其中config.toml是配置文件,之后需要对其进行博客的配置。public是hugo生成的静态页面的存储目录。themes存放主题文件。content存放博客文章。
下载hugo主题包
hugo和hexo一样,有许多的网站主题可以选择。可以进入hugo主题页进行查看,笔者选择了hermit主题,直接在生成的博客目录下的themes目录下打开git bash,并将源码克隆到本地,过程如下。
$ cd themes/

Dell@DESKTOP-22JGA5Q MINGW64 /h/hugo/blog_text/themes
$ git clone https://github.com/Track3/hermit.git
Cloning into 'hermit'...
remote: Enumerating objects: 787, done.
remote: Total 787 (delta 0), reused 0 (delta 0), pack-reused 787
Receiving objects: 100% (787/787), 461.32 KiB | 476.00 KiB/s, done.
Resolving deltas: 100% (347/347), done.
Checking out files: 100% (60/60), done.
配置config.toml文件
hermit主题下有一个示例网站,其中有一个模板配置文件,用该文件将博客顶层目录下的config.toml覆盖。下面是模板配置文件的具体内容。
baseURL = "https://example.com" languageCode = "en-us" defaultContentLanguage = "en" title = "Hugo Hermit" theme = "hermit" # enableGitInfo = true pygmentsCodefences = true pygmentsUseClasses = true # hasCJKLanguage = true # If Chinese/Japanese/Korean is your main content language, enable this to make wordCount works right. rssLimit = 10 # Maximum number of items in the RSS feed. copyright = "This work is licensed under a Creative Commons Attribution-NonCommercial 4.0 International License." # This message is only used by the RSS template. enableEmoji = true # Shorthand emojis in content files - https://gohugo.io/functions/emojify/ # googleAnalytics = "UA-123-45" # disqusShortname = "yourdiscussshortname" [author] name = "John Doe" [blackfriday] # hrefTargetBlank = true # noreferrerLinks = true # nofollowLinks = true [taxonomies] tag = "tags" # Categories are disabled by default. [params] dateform = "Jan 2, 2006" dateformShort = "Jan 2" dateformNum = "2006-01-02" dateformNumTime = "2006-01-02 15:04 -0700" # Metadata mostly used in document's head # description = "" # images = [""] themeColor = "#494f5c" homeSubtitle = "A minimal and fast theme for Hugo." footerCopyright = ' · <a href="https://creativecommons.org/licenses/by-nc/4.0/" target="_blank" rel="noopener">CC BY-NC 4.0</a>' # bgImg = "" # Homepage background-image URL # Prefix of link to the git commit detail page. GitInfo must be enabled. # gitUrl = "https://github.com/username/repository/commit/" # Toggling this option needs to rebuild SCSS, requires Hugo extended version justifyContent = false # Set "text-align: justify" to `.content`. relatedPosts = false # Add a related content section to all single posts page code_copy_button = true # Turn on/off the code-copy-button for code-fields # Add custom css # customCSS = ["css/foo.css", "css/bar.css"] # Social Icons # Check https://github.com/Track3/hermit#social-icons for more info. [[params.social]] name = "twitter" url = "https://twitter.com/" [[params.social]] name = "instagram" url = "https://instagram.com/" [[params.social]] name = "github" url = "https://github.com/" [menu] [[menu.main]] name = "Posts" url = "posts/" weight = 10 [[menu.main]] name = "About" url = "about-hugo/" weight = 20参照对应注释进行个性化修改即可。
博客本地调试
当配置成功之后,可以在本地进行预览博客的效果,只需在博客目录执行hugo的server指令即可。过程如下。
Dell@DESKTOP-22JGA5Q MINGW64 /h/hugo/blog_text
$ ../hugo.exe server
Start building sites …
hugo v0.111.3-5d4eb5154e1fed125ca8e9b5a0315c4180dab192+extended windows/amd64 BuildDate=2023-03-12T11:40:50Z VendorInfo=gohugoio

                   | EN
-------------------+-----
  Pages            |  5
  Paginator pages  |  0
  Non-page files   |  0
  Static files     | 10
  Processed images |  0
  Aliases          |  0
  Sitemaps         |  1
  Cleaned          |  0

Built in 173 ms
Watching for changes in H:\hugo\blog_text\{archetypes,assets,content,data,layouts,static,themes}
Watching for config changes in H:\hugo\blog_text\config.toml
Environment: "development"
Serving pages from memory
Running in Fast Render Mode. For full rebuilds on change: hugo server --disableFastRender
Web Server is available at http://localhost:1313/ (bind address 127.0.0.1)
Press Ctrl+C to stop
按照提示,在http://localhost:1313/打开即可预览。截图如下。

生成静态页面
静态博客需要的是静态页面,这一过程是通过hugo进行构建的,直接执行指令如下。
Dell@DESKTOP-22JGA5Q MINGW64 /h/hugo/blog_text
$ ../hugo.exe
Start building sites …
hugo v0.111.3-5d4eb5154e1fed125ca8e9b5a0315c4180dab192+extended windows/amd64 BuildDate=2023-03-12T11:40:50Z VendorInfo=gohugoio

                   | EN
-------------------+-----
  Pages            |  5
  Paginator pages  |  0
  Non-page files   |  0
  Static files     | 10
  Processed images |  0
  Aliases          |  0
  Sitemaps         |  1
  Cleaned          |  0

Total in 438 ms
此时博客的静态页面构建成功,其对应文件存储于public目录下。具体文件列举如下。
Dell@DESKTOP-22JGA5Q MINGW64 /h/hugo/blog_text/public
$ ls
404.html                    favicon.ico        mstile-150x150.png
android-chrome-192x192.png  favicon-16x16.png  safari-pinned-tab.svg
android-chrome-384x384.png  favicon-32x32.png  site.webmanifest
apple-touch-icon.png        index.html         sitemap.xml
browserconfig.xml           index.xml          tags/
css/
GitHub部署
参照hugo中文文档,首先在GitHub上创建一个Repository,命名为:name.github.io (name替换为你的github用户名)。并通过git将public目录下的文件直接同步到对应仓库即可。此时就可以通过name.github.io这个网址访问到所建的博客了。
5.参考资料
https://www.gohugo.org/

https://gohugo.io/getting-started/

https://docs.halo.run/

https://zak.ee/writing/2018/hugo-theme-hermit/

https://www.sulvblog.cn/posts/blog/how_to_write_a_blog/

https://www.gohugo.org/post/coderzh-hugo/

https://sspai.com/post/59904#!

https://www.runoob.com/docker/docker-tutorial.html

https://zhuanlan.zhihu.com/p/323322650

https://zhuanlan.zhihu.com/p/56341917

https://zhuanlan.zhihu.com/p/210428775

https://cloud.tencent.com/developer/article/1360110